Grape Juice
An alternative to fresh wine grapes!
Fresh grapes are only available twice a year after the grapes are harvested. Each hemisphere has a harvest season for grapes in the fall. The grape juice is carefully monitored for the opportune moment to harvest. How do the growers know when the time is right?
Here is how:
The grape juice is extracted from crushed grapes in the field and tested with a device called a refractometer. The refractometer is used to measure the brix of the grape juice, which is the percentage of sugar in the juice. When making wine, sugar is converted into alcohol by yeast. The final result in the wine is approximately 50% of the sugar content. For example, grape juice with a sugar content of 25% will yield a wine approximately 12.5% abv. As you can imagine, there is a small window of time when the grape juice is at it’s optimal sugar content.
After harvest, wine makers are scrambling to make the wine in a timely fashion, before the grapes spoil. This is a whole lot of work and a very busy time for wine makers. Wouldn’t it be great if the grapes could be harvested at the peak of ripeness, the grape juice extracted and then frozen!
That is what is available in frozen pails of wine grape juice. These frozen pails have grape juice from the best vineyards all over the world and the grape juice is not from concentrate! Just fresh pressed grape juice. Pretty sweet, huh?
Wine Grape Juice
The beauty of making wine from these pails of frozen grape juice is that it is so easy! You don’t need to crush or press any grapes, all that hard work is done for you. Not to mention that it already comes is a food grade bucket that will work perfectly as your primary fermentor! I actually save these pails for use as primary fermenters when making the Vino Italiano Wine Kits. It is actually easier to make wine from a pail of frozen grape juice then from a wine making kit!
There is no need to add water or anything. You can actually ferment this grape juice using the natural yeast in the juice! I have actually done that, but many times I opt to use specific wine yeasts to add to grape juice. When making wine from these pails of grape juice, it talks longer periods of time for the wine to mature before it is considered drinkable. The wine, however is excellent.
I usually choose to make some low end wine kits, like the Vino Italiano Wine Kits, some high end wine kits, like the Winexpert Eclipse kits at the same time as making wine from these pails of grape juice. The reason I do this is as follows:
- The Vino Italiano Wine Kit will be drinkable soonest. Drink this wine while waiting for the others to come into their own.
- The Winexpert Wine Kit will mature while you are drinking the Vino Italiano wine and be drinkable next.
- The wine you made from the pail of grape juice will be maturing all the time you are drinking the wine from the wine kits.
Making wine in these varied ways insures you that you will have a supply of wine that is maturing at different wines, and you will be less tempted to drink the wines before they reach proper age. This is why I say that every method of making wine has its place.
SPECIAL DO THIS NOTE: Take six bottles of wine when you are done with the process and put them in a box. Put that box away where you will not get to it easily. Write the date on the box with a marker and commit to the fact that you will not open that box until at least two years from the date you have written down. Do this whenever you bottle wine, regardless of if it was from a kit, grape juice or fresh grapes.

A Pail Of Amarone Grape Juice Imported From Italy.
I decided that in order for me to show you how to make wine from a pail of grape juice, it only made sense to make one and show you the process. Work, work, work… So, I purchased this pail of Amarone grape juice that was imported from Italy.
I love Italian wines so you could imagine how cool it is fro me to get a pail of genuine Italian grape juice! I am so excited to demonstrate making this wine for you. I bought it from a local wine grape and grape juice importer in New York. Going to the store in person is one of my favorite field trips. It was like being in a kid in a candy store.

Wine Making Store Is A Fun Visit
Needless to say, this was a fun visit for me to make to the store, A&P Grape… I highly recommend that if you are in the New York area, it is worth the trip to see them. Peter and the crew are awesome.
Wine Making Supplies
So I got this great pail of grape juice, and I will go over how to make wine from it. You will see all these steps in my videos, if you check my YouTube channel.
First, you will need to let the grape juice come to room temperature, around 70 degrees. After it comes up to room temperature, you will need to take the top off of the pail of grape juice. Carefully remove the top, and stir the grape juice with a clean and sanitized spoon. I recommend taking a specific gravity reading with a hydrometer, so that you can measure the sugar content of the grape juice.
Remember the refractometer we spoke of earlier? That is better suited for use in the vineyard, while a hydrometer works better for measuring in this wine making process. So, take a reading and write it down in your log book. After you give the grape juice a good stir, you will want to do one of the following:
- Ferment of the wild yeast in the gape juice pail
- Sprinkle a specific wine making yeast on the grape juice
- Make a “Slurry” with the wine yeast in a cup of warm water, let it activate and get foamy for about 30 minutes and then add that to the grape juice. You can see how to do this in my YouTube video here.
Whatever you decide to do, you will want to put the top back on the pail and snap it down, but first you will want to remove the little black plug. After inoculating your grape juice with yeast and putting the top back on, set it aside for a few days to ferment. This process is called Primary Fermentation.
Some people add oak sawdust to the primary fermentation, and if you want to do that, you can. All you would need to do is add it to the grape juice before pitching the yeast.
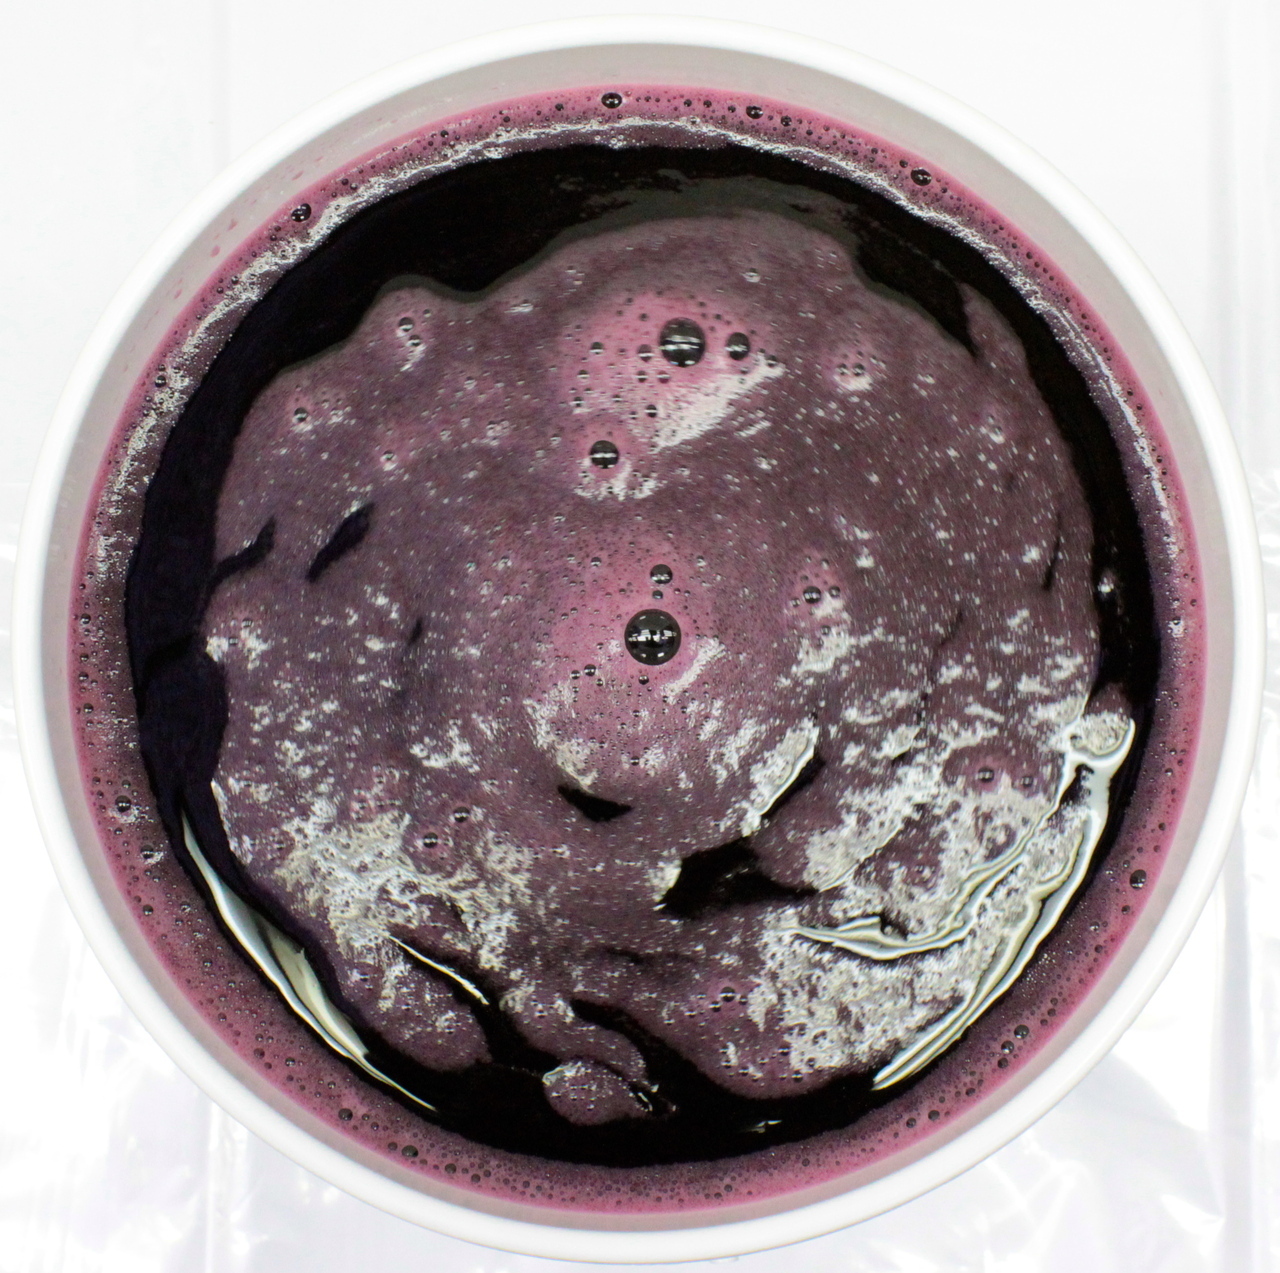
During primary fermentation, the grape juice will seem to boil violently as it ferments. This is typical, as the yeast is eating the sugar, producing alcohol and fermenting out your grape juice. The primary fermentation should take around 5 to 7 days. Try to stir the grape juice each day with a clean and sanitized spoon.
After about 5 – 7 days, your grape juice should have completed primary fermentation. Clean and sanitize the hydrometer and take another reading. You should get a much lower reading at this time, since the yeast has transformed much of the sugar in your grape juice into alcohol. Transfer the grape juice from the bucket into a clean and sanitized carboy.
This part of the wine making process is called Secondary Fermentation. At this time, I may decide to add some yeast nutrient, if I feel it is needed to give fermentation a boost, but that is not necessary. Seal the carboy with a bung and airlock. I prefer to fill the airlock with Vodka, but some folks use water.
As an option, you may decide to add some toasted oak cubes to the wine. I prefer to add some, but I only use a little. I don’t like overly oaky wines, and I feel most commercial wines are over oaked. Set the carboy aside and let the fermentation finish.
After about six weeks, your wine should be bone dry. Take a reading with your cleaned and sanitized hydrometer and it should read below 1.0. It is time to transfer the grape juice, that is now wine, to another clean and sanitized carboy. The transfer process is called Racking, and when doing so I use an auto siphon with an anti-sediment tip. Leave the sediment behind with each racking of the grape juice. Affix your airlock and put the carboy aside for about three months.
Three months later, it is time to rack the grape juice to another carboy with your auto-siphon with anti sediment tip. After racking, I add some sulfites to the wine. I like to use Camden tablets, as it is easy to measure. All you need to do is crush one tablet per gallon of wine and add stir it into the grape juice.
Then, I take my mix stir device attached to a drill and de-gas the wine. After I degas, I mix up some sparkoloid with hot water, as per the directions. If you look at my videos, you will see that I do this for every wine I make. I then stir the sparkoloid into the wine. After doing this, affix your bung and airlock and set the carboy aside for 14 days.
After 14 days, carefully place the carboy on a high surface, being very careful not to disturb the sediment. Let it sit for about a half hour. Then, you will rack again into a clean carboy, leaving behind the sediment. You will need a smaller carboy this time, as in each racking some wine is lost. You want to minimize the air space in the carboy.
Your wine should have cleared nicely. You can at this time cork the carboy, or affix the airlock and bung. I bulk age the carboy at this stage about 4-6 months. If you are using an airlock, check it each month to make sure it hasn’t dried up.
Set the wine aside and let it age. I told you this takes longer than a kit! That’s ok, because you have that kit wine to drink while you are being patient. After bulk ageing, it is time to make some decisions before bottling. You need to decide:
- Should you filter your wine?
- If so, use your filter to filter the wine into a clean carboy. Some folks say that you should always filter wine. I always filter white wines. Sometimes, I filter red wines. Here is a video where I am demonstrating filtering.
- Do you want to the wine dry or sweet?
- If you want to back sweeten your wine, you will need to add 1/4 teaspoon of potassium sorbate for each 6 gallons of wine before sweetening. Please look at my video on back sweetening or read my article on back sweetening wine for detailed instructions.
- Do I just want it dry?
- It is time to bottle…
When you are ready to bottle, you may decide to sulfite the wine again with the Camden tablets. Most winemakers will recommend it, but it is your call. Many times, I choose not to. I do, however, clean and sulfite the bottles. I let the bottles drip dry upside down on a bottle tree. The sulfites make a thin film on the inside of the bottle after it dries. When wine enters the bottle, the liquid hits the sulfites, produces a gas that fills the bottle before corking.
With all of this talk about sulfites, making wine this way produces a wine that has about 25% of the sulfites in commercial wines.
I sure hope you have enjoyed this article on the process of transforming grape juice into wine, which is a common theme on this website. Frozen pails of grape juice is an alternative to making wine with wine kits. Since you are working with grape juice, the work of crushing and pressing your own grapes is avoided.
HI Prince-
Hope all is well,
love the website as I have not seen anyone else take the time to carefully explain the process of making wine from juice pail.
I buy my stuff at ap and pete/victor and crew are the best!
I was hoping you can help with a few questions
1. You don’t mention using any meta bi sulphide at the beginning during primary?
I have seen conflicting answers on if and/or when that is needed.
2. Would be great if you could provide some additional guidance on temperatures required during primary, secondary and bulk aging.
3. Currently, I have 2 x6 gallons and 2x 5 gallons carboys, which yielded about 50 bottles and i would up giving a fair share of out away.
i would like to make a larger batch and not wanting to buy several other 6g’s and 5gs. How would you recommend scaling my operation? Considering pulling the trigger for a 54l glass demijohn, but struggling to figure out how many pails i can reasonably make?
Would you be kind enough to share your thoughts?
Thanks!
Kevin
Hi Kevin,
Peter at AP is a good guy. As for your questions:
1) For me, I try to minimize the sulfites. Many times, I do put sulfites when using fresh fruit at the beginning. I always wait at least 24 hrs before pitching yeast. I use only a minimal amount a sulfites.. I use them again after fermentation is complete.
2) It is good to have it around 75 Degrees for fermentation.
3) Scaling up would depend on what you want to do. I like to use lots of carboys, as I have lots of wines… If I were making all the same wine, then I would look for a bigger Demijohn.
Hope that helps.